


Imager Barcode Scanner
An imager barcode scanner is a camera that reads a code from a picture. It reads 1D and 2D codes from any angle, off paper and phone screens alike, and it has no moving parts to break. This guide, reviewed in September 2026, covers how it works and what to buy.
Reviewed August 2026. Each figure comes from the assumptions stated beside it, so you can substitute your own and the arithmetic still holds.
Published 8 August 2026. Reviewed and updated 15 September 2026.
Book a callWhat Is an Imager Barcode Scanner?
An imager barcode scanner is a device that captures a photo of a barcode, then uses software to turn that image into readable data. Think of it like a smartphone camera that only cares about barcodes.
Laser scanners work differently. They bounce a beam off a barcode and read the reflection. That method works fine for simple 1D barcodes, the kind with parallel lines, but it cannot read 2D barcodes like QR codes.
An imager has no such limit. It reads both 1D and 2D codes from a single scan.
For a warehouse operator, that means one device handles every label type you are likely to encounter, from a UPC on a retail carton to a Data Matrix on a pharmaceutical lot.
Would you rather have it built around your operation?
The first look is free. If you would rather not compare products, describe how your operation already works and we build the system around it.
No build cost. You see it running on your own process first, and the monthly subscription starts only once it is live.
Book a callHow Does an Imager Barcode Scanner Work?
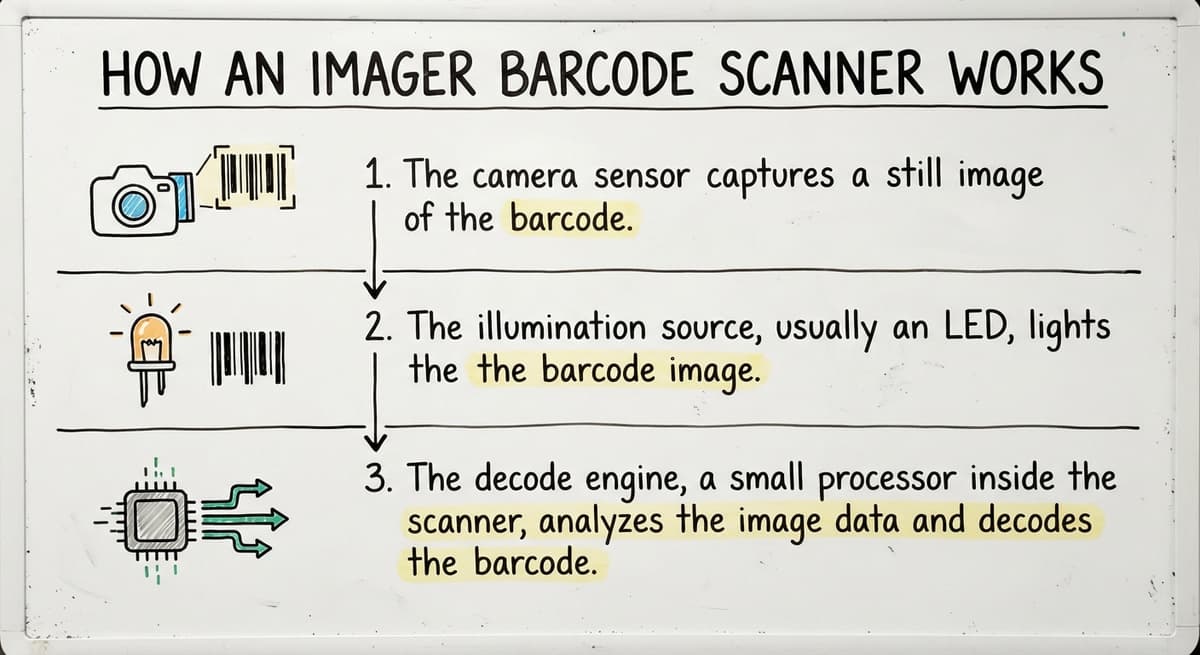
The scanner uses 3 core components: a camera sensor, an illumination source, and a decode engine.
- The camera sensor captures a still image of the barcode.
- The illumination source, an LED, lights the label so the image is sharp even in dim conditions.
- The decode engine, a small processor inside the scanner, runs software that turns the pattern of pixels into a string of characters.
That string then travels through the scanner's connection, USB, Bluetooth, or Wi-Fi, to your computer or inventory system, where it appears as typed text.
Why Are Imager Scanners More Durable Than Laser Scanners?
With no moving mirrors or spinning parts, an imager barcode scanner has fewer things that can break. A laser scanner's mirror can wear out or get knocked out of alignment. An imager simply does not have that problem.
GS1, the global body that sets barcode standards, defines the rules that make this decode step reliable across millions of different products.
As GS1 explains at gs1.org/standards/barcodes, their standards cover the data structures and symbologies that scanners decode, ensuring a barcode printed in one country reads correctly on a scanner in another.
Imager vs Laser Barcode Scanner: Which One Do You Actually Need?
An imager scanner is the better choice for almost every warehouse built or upgraded today. Laser scanners read 1D barcodes only, using a moving mirror to sweep a beam across the label. That works at a point-of-sale counter with clean, printed labels. It struggles with anything else.
Here is a direct comparison:
| Feature | Laser Scanner | Imager Scanner |
|---|---|---|
| Reads 1D barcodes | Yes | Yes |
| Reads 2D barcodes (QR, Data Matrix) | No | Yes |
| Moving parts | Yes (mirror) | No |
| Handles damaged labels | Poorly | Well |
| Works at multiple angles | Limited | Yes |
| Long-term durability | Lower | Higher |
When Is a Laser Scanner Still Acceptable?
Imagers are far better than laser scanners on damaged, wrinkled, or low-contrast labels. In a receiving dock where labels arrive crumpled from transit, that matters every single shift.
Laser scanners cost less upfront. If you already own them and they meet your needs, there is no urgent reason to replace them. If you are buying new hardware today, an area imager is the practical choice.
Types of Imager Barcode Scanners
Not all imagers are the same. The right type depends on where and how your team scans.
What Barcode Types Can an Imager Read?
A modern area imager reads every common barcode symbology out of the box, with no extra setup required. The term "symbology" just means the format or language a barcode is written in.
Common 1D codes your imager will read:
- UPC-A and UPC-E (retail products)
- EAN-13 and EAN-8 (international retail)
- Code 128 (shipping and logistics)
- Code 39 (industrial and government)
- Interleaved 2 of 5 (cartons and warehouse labels)
Common 2D codes your imager will read:
- QR Code (links, product data, traceability)
- Data Matrix (small parts, pharmaceuticals, electronics)
- PDF417 (ID cards, shipping labels, compliance documents)
Why 2D Codes Matter for Regulated and Traceable Goods
2D codes hold far more data than 1D codes. A Code 128 barcode might carry a 20-character item number. A Data Matrix on the same label can carry the item number, lot number, expiry date, and serial number together.
For inventory tracking in food, pharma, or regulated goods, that extra data is not optional. It is the difference between knowing what you have and knowing what you have, when it expires, and where it came from.
GS1 maintains the global registry of barcode standards that define how this data is structured and shared across supply chains. You can review the full list of supported symbologies at gs1.org/standards/barcodes.
Is the comparison easier when one option is built for you?
Yes. Off-the-shelf means fitting your process to the software, and custom is the other way round. The first look costs nothing.
Book a callWhy Warehouses and Distributors Choose Imager Scanners
The practical reasons are 3: speed, accuracy, and label reality.
Faster first-scan read rates mean workers spend less time re-scanning. Every failed scan is a small delay. Across a shift with hundreds of picks, those delays add up.
Imagers work at multiple angles. A worker does not need to hold the scanner perfectly level over a label. That reduces the physical effort per scan and speeds up picking and packing.
Labels in a receiving dock are rarely perfect. They arrive creased, damp, or partially torn. An area imager reads them. A laser scanner cannot.
Modern 2D labels carry lot numbers, expiry dates, and serial numbers in a single scan. If your suppliers use GS1-standard labels, an imager lets you capture all of that data in one pass, rather than typing it by hand.
The Cost of Not Switching to Imager Scanners
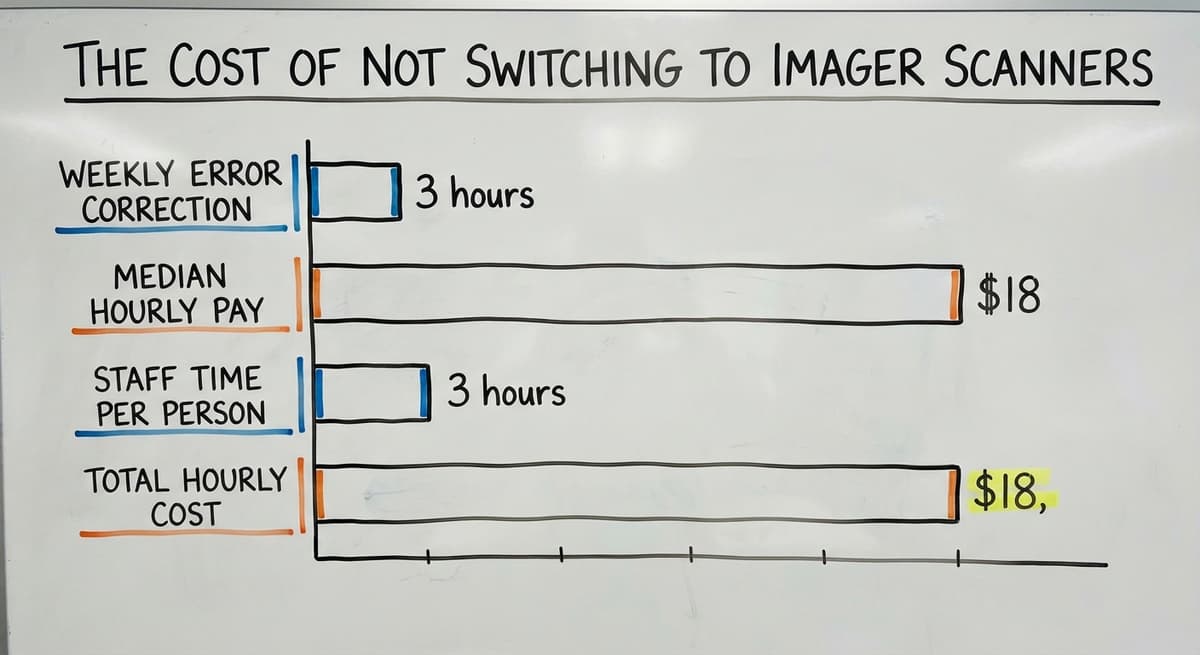
Consider the cost of manual entry. If 2 receiving staff each spend 3 hours a week correcting data entry errors, and the Bureau of Labor Statistics reports median pay for stock clerks and order fillers at around $18 per hour (bls.gov/oes/current/oes435071.htm), that is 2 people times 3 hours times $18, which equals $108 per week, or roughly $5,600 per year, just in correction time. A pair of rugged imager scanners costs a fraction of that.
Corded vs Cordless Imager Barcode Scanners
The choice between a corded and a cordless barcode scanner is mostly about where your workers move.
Corded USB scanners plug directly into a computer or terminal. They are always connected, never run out of battery, and cost less than cordless models. They suit fixed scan stations: a receiving desk, a packing bench, or a shipping counter where the worker stays in one spot.
A cordless Bluetooth barcode scanner pairs with a computer, tablet, or handheld device. Workers carry it across the floor, up aisles, or to a loading dock without trailing a cable.
Battery life and wireless range are the main trade-offs. Most Bluetooth scanners last a full 8-hour shift on a charge. Range varies by model, but 30 feet is common and some models reach 300 feet.
How to Decide Which to Buy First
For tight budgets, start with a corded imager barcode scanner at your highest-volume fixed stations. Add cordless models for roles where movement is constant, such as forklift operators or workers covering a large pick floor.

Rugged vs Standard Imager Scanners
Standard scanners target light use: retail counters, office mail rooms, or low-traffic scan points. Drop one on a concrete floor and you may be ordering a replacement the same day.
Rugged scanners carry ratings that tell you exactly how much punishment they can take. The 2 ratings to look for are:
- IP rating (Ingress Protection): two digits. The first covers dust, the second covers water. An IP65 scanner is fully dust-tight and handles water jets. An IP67 adds submersion to 1 metre for 30 minutes.
- MIL-STD-810: a US military standard for drops, vibration, temperature swings, and humidity. A scanner rated to MIL-STD-810G has passed a defined set of drop tests, from 5 or 6 feet onto concrete.
The True Cost of Choosing a Standard Scanner for Warehouse Use
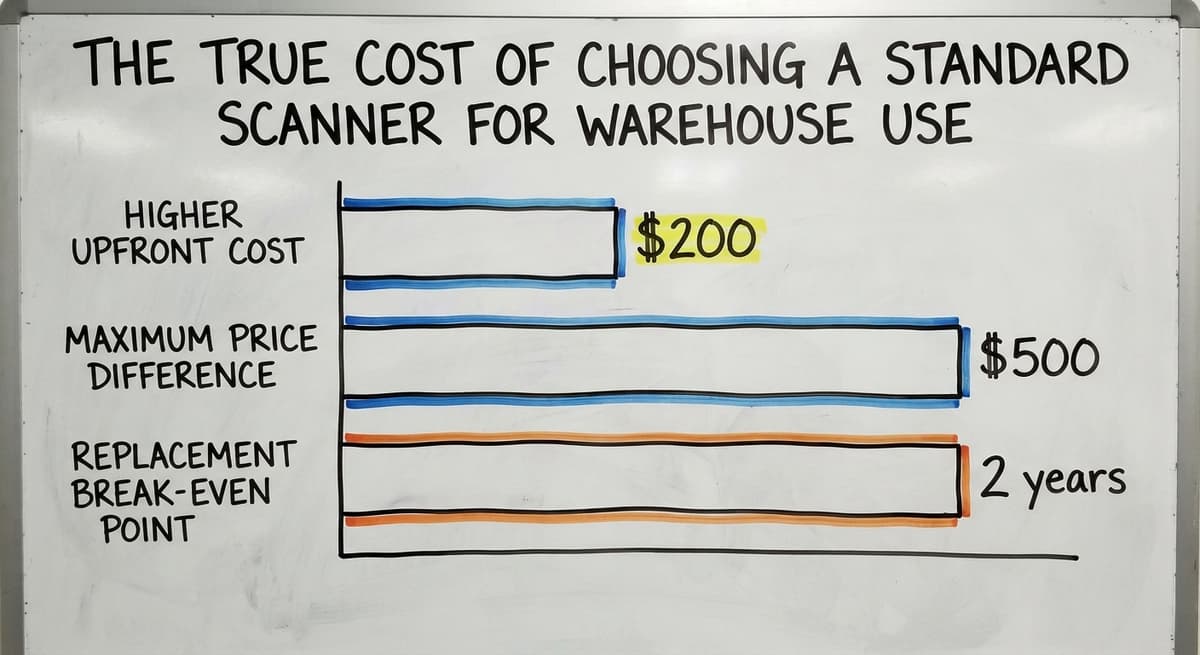
Warehouses and distribution centres almost always need rugged-rated devices. A rugged scanner costs more upfront, $200 to $500 more than a comparable standard model. Replace a standard scanner 3 times in 2 years and the rugged unit was cheaper from the start.
How Do Imager Scanners Connect to Your Inventory Software?
Most imager scanners connect to your system the moment you plug them in, because USB HID mode makes the scanner act like a keyboard. HID stands for Human Interface Device.
The computer sees it as a keyboard, so the scanner works with any software that accepts typed input, no drivers needed.
The main connection types are:
- USB HID: plug in, start scanning. Works with Windows, Mac, and most inventory or accounting software.
- Bluetooth: pairs with a computer, tablet, or mobile device. The scanner sends keystrokes wirelessly, just like a wireless keyboard.
- Serial RS-232: an older interface still found in legacy warehouse terminals. Some rugged scanners still include it for compatibility with older systems.
- Wi-Fi networked scanners: connect directly to your network and send data to a central server in real time. More complex to set up but useful in large operations where scan data needs to reach a central system instantly.
What does it look like running on your own process?
The first thing you see is it running on your own process, at no build cost. The subscription starts once it is live and doing the job, not before.
Book a callWhich Connection Type to Start With
For most small distributors, USB HID is the right starting point. It requires no IT support and works on day one.

Imager Barcode Scanners and the accounting software
Many small distributors run their business on the accounting software. A USB imager scanner in HID mode types data directly into any the accounting software field, just as if a person typed it.
Scan a barcode at the receiving screen and the item number appears. No manual entry, no typos from misread labels.
What the accounting software Cannot Do on Its Own
The limit is the accounting software itself. The accounting software does not track inventory locations, lot numbers, or bin assignments in real time. It records quantities, but it does not know that your stock of Item A is in Aisle 3, Bin 7, or that half of it expires in 90 days.
A scanner paired with the accounting software alone is a step forward. It removes keyboard errors. It does not give you a full barcode inventory management system.
The gap is filled by an inventory layer that sits between the scanner and the accounting software. That layer handles the logic the accounting software cannot: location tracking, lot control, pick routing, and receiving workflows. It then posts the financial summary to the accounting software automatically.
If you want to understand how that connection works in practice, the article on how to connect the accounting software to a warehouse inventory system walks through the architecture in plain terms.
Where Imager Scanners Fit in a Barcode Inventory Management System
The imager barcode scanner is the data-entry device. The inventory system is the brain.
Without software behind it, a scanner is a fast keyboard. With the right software, every scan becomes a live update to your stock records, location data, and order history.
Here is how scanners fit into each warehouse workflow:
- Receiving: scan items as they arrive. The system checks the purchase order, updates stock counts, and flags discrepancies.
- Picking and packing: scan to confirm the correct item and quantity before it goes into a carton. Wrong picks get caught before they ship.
- Shipping: scan the packed carton to trigger an invoice, shipment record, or carrier label in your connected software.
- Cycle counting: scan shelf labels and item barcodes to count stock without shutting down the warehouse.
Why Accurate Scanner-Fed Records Matter at Tax Time
For a deeper look at how receiving and shipping workflows connect to scanner input, the article on receiving and shipping workflow automation for distributors covers the process step by step.
The IRS is clear on why accurate inventory records matter beyond operations.
IRS Publication 538 states: "To figure taxable income, you must value your inventory at the beginning and end of each tax year." (irs.gov/publications/p538) A scanner-fed inventory system makes that valuation accurate and auditable, rather than a manual estimate.

Common Problems Imager Scanners Solve in Small Warehouses
Most small warehouse operators come to an imager barcode scanner after a specific pain, not as a planned upgrade; there are 4 common ones.
Manual data entry errors cause mis-ships and wrong invoices. A customer receives the wrong item. Your team spends time on returns and corrections. A scanner removes the human transcription step entirely.
Slow receiving creates a backlog at the dock. When a worker types each item number by hand, a 50-line purchase order takes 40 minutes to receive. Scanning the same order takes under 10.
Inventory counts that rely on printed sheets and spreadsheet updates are always out of date. By the time someone updates the spreadsheet, stock has moved again. Scanner-fed software updates in real time.
When the Scanner Alone Is Not Enough
Lost or misplaced stock is common when location is tracked only in someone's memory. A scanner-based system records where each item was put away. Any worker can find it.
If your team is still updating spreadsheet after scanning, the bottleneck is the system, not the scanner. Replacing spreadsheet-based inventory tracking with custom software is the next step once scanners are in place.
What to Look for When Buying an Imager Barcode Scanner
There are 5 questions that narrow the field quickly.
1. Do you need 1D only, or 1D and 2D? If any of your labels carry QR codes, Data Matrix, or PDF417, you need an area imager.
If every label is a standard 1D barcode today and that will not change, a linear imager costs less.
2. What environment will it work in? Office or light retail: a standard scanner is fine. Warehouse, dock, or cold storage: choose a rugged scanner with an IP65 or higher rating and MIL-STD-810 certification.
3. Corded or cordless? Fixed station: corded. Mobile worker or large floor area: Bluetooth cordless.
4. What scan range do you need? Short range (0 to 12 inches) suits countertops and packing benches. Mid range (up to 3 feet) covers standard warehouse picking. Long range (up to 30 feet or more) is needed for high-bay racking or forklift-mounted scanning.
5. How does it connect to your software? Confirm your inventory software accepts scanner input before you buy hardware. USB HID works with almost everything. Wi-Fi or Bluetooth may need configuration.
Scan Range and What It Means for Your Operation
Choosing the wrong scan range is one of the most common imager barcode scanner buying mistakes. Workers end up climbing shelves or pressing scanners against labels to get a read.
- Short range (0 to 12 inches): counters, point of sale, packing benches. Good for close work where labels are right in front of the worker.
- Mid range (up to 3 feet): standard warehouse picking from shelf level. Most general-purpose warehouse scanners fall here.
- Long range or extended range (up to 30 feet and beyond): high-bay racking, forklift-mounted scanners, or any situation where the worker cannot get close to the label.
A long-range imager costs more but prevents the frustration and missed scans that come from using a mid-range device in a tall-racking environment. If your racking runs above 10 feet, budget for extended-range capability from the start.
What is in a free first look?
A 30 minute call, your operation mapped, and a clear picture of what we would build. No obligation and nothing to install.
Book a call
How Many Barcode Scanners Does a Small Warehouse Need?
Start with one scanner per active scan station, plus one spare per 5 devices. That rule covers most small operations without over-spending.
For a warehouse with a receiving desk, a packing bench, and a shipping station, that is 3 scanners plus 1 spare. Total: 4 units.
High-volume operations assign a scanner to each shift worker rather than each station. If 6 people pick simultaneously across a large floor, 6 cordless scanners plus 1 or 2 spares is the right count.
Where to Start When Budget Is Limited
Start with receiving and shipping stations first. Those 2 points generate the most errors and the biggest gains from scanning. Add picking stations next as budget allows.
Always budget for spares. A scanner in for repair means a worker typing by hand. One spare unit prevents that.
The US Census Bureau tracks wholesale trade inventories nationally (census.gov/wholesale/index.html), and the inventories-to-sales ratio for wholesale firms shows how much capital sits in stock at any time. A single day of manual-entry errors in a busy warehouse can distort that figure enough to cause real ordering mistakes.
Setting Up an Imager Scanner Without an IT Department
Most small distributors do not have an IT team. The good news is that most imager scanners target exactly that situation.
A USB imager is plug-and-play on Windows and Mac. Plug it in, wait 10 seconds, and it is ready. No software to install. No driver disc to find.
Bluetooth pairing takes under 5 minutes. Scan the pairing barcode in the manual, find the device on your computer's Bluetooth menu, and connect.
Changing Scanner Settings Without a Technician
Most scanners are pre-configured for standard settings. They output a carriage return after each scan, which works with almost every software field.
If you need to change a setting, such as adding a prefix character before each scan or changing the output format, the manual includes programming barcodes. Scan the right barcode and the scanner reconfigures itself. No computer needed.
NIST's Manufacturing Extension Partnership notes that simple, well-documented processes are a key factor in supply chain reliability for small manufacturers and distributors. (nist.gov/mep/supply-chain) Scanner setup that takes under 10 minutes fits that principle directly.
Maintaining and Caring for Your Imager Barcode Scanner
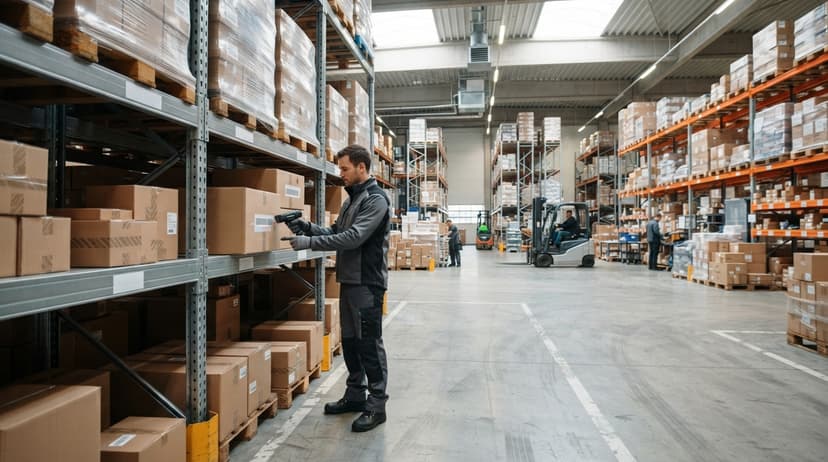
A scanner that fails mid-shift costs more than the repair bill. It costs the time your team loses while it is down.
4 habits keep scanners running:
- Clean the scan window with a soft cloth every few days. Dust and grime on the window cause read failures that look like label problems.
- Store cordless units on the charging cradle at the end of each shift. A scanner found dead in the morning is a preventable problem.
- Check corded cables regularly. A frayed cable near the connector causes intermittent dropouts. Replace it before it fails completely.
- Register devices under a warranty or service plan. Know the process before a unit breaks, not after.
Rugged scanners are built to take abuse, but they still need basic care. A clean scan window and a charged battery are the 2 things that prevent most day-to-day failures.
When a Scanner Alone Is Not Enough
A scanner captures data. It cannot organise, route, or report on that data without software behind it.
If your team scans items at the dock and then walks to a computer to update a spreadsheet, the scanner saved one step. The bottleneck moved. It did not disappear.
The right software makes every scan update stock levels, locations, and records automatically, with no second step. Workers scan. The system does the rest.
For small distributors who have outgrown an accounting package and spreadsheets, custom warehouse software for small distributors follows your actual workflow rather than a generic template.
The scanner becomes genuinely useful when the system behind it targets how your operation actually runs.
The NIST Manufacturing Extension Partnership describes this as aligning process to capability: the tool should fit the work, not the other way around. (nist.gov/mep/supply-chain)
Getting Started with Imager Scanners in Your Operation
The fastest path to fewer errors and faster throughput follows 4 steps.
- Audit your pain points. Where do errors happen most? Where does your team lose time? Receiving dock delays and mis-ships are the most common answers.
- Choose scanner type and quantity based on those specific stations. Do not buy for every station at once. Start where the gain is biggest.
- Confirm your inventory software accepts scanner input before purchasing hardware. A USB HID scanner works with almost anything. A Wi-Fi scanner may need configuration work.
- Consider a custom software build if your current tools cannot close the loop. A scanner feeding data into a system that still requires manual follow-up is a half-solution.
When to Bring in a Developer
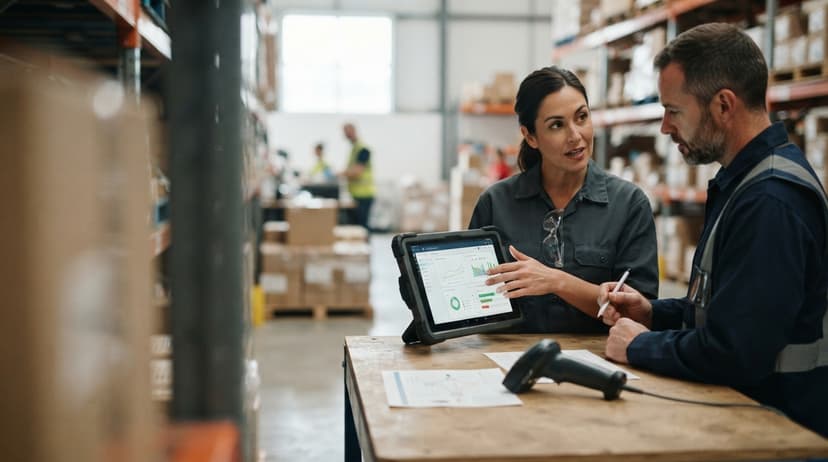
A barcode inventory management system built around your real workflow, with imager scanners at every key station, is the practical upgrade that replaces printed sheets, spreadsheet updates, and manual entry in one move.
If your current tools cannot do that, the team at The Software Society builds custom inventory and workflow systems for small distributors.
The work starts with your actual process, not a generic template. Reach out to talk through what a connected system would look like for your operation.
Frequently asked questions
Frequently asked questions
Can I scan a barcode using an image?
Yes. An imager barcode scanner works by capturing an image of the barcode and decoding it. The same principle applies to smartphone apps: most barcode scanning apps use your phone's camera to capture an image and decode it in real time.
The key difference between a dedicated imager scanner and a phone app is speed, reliability, and durability in a work environment.
Can I take a picture of a barcode and scan it?
Yes, with the right software. A smartphone camera can capture a barcode image and a scanning app can decode it. Dedicated imager barcode scanners do this faster and more reliably than a phone, especially in low light or with damaged labels.
For occasional use, a phone works. For a warehouse scanning hundreds of items per shift, a dedicated scanner is the right tool.
What's the best free barcode scanner?
There is no single best answer. For smartphones, apps like Scandit, Barcode Scanner by ZXing, and the built-in camera app on most modern phones all decode barcodes at no cost.
For warehouse use, free apps are limited by phone durability and scan speed. The better question for a warehouse operator is which dedicated hardware scanner fits the environment and budget, not which app is free.
Can I scan a bar code with my phone?
Yes. Most smartphones running iOS or Android can scan barcodes using the built-in camera app or a free scanning app. iPhones running iOS 11 or later decode QR codes directly from the camera without any app.
For 1D barcodes like UPC or Code 128, a free app such as Barcode Scanner handles the job. For regular warehouse work, a dedicated imager scanner is faster and more durable than a phone.
Which type of imager scanner is best for a small warehouse or distribution centre?
An area imager with a rugged rating is the best starting point for most small warehouses. It reads both 1D and 2D barcodes, handles damaged labels, and survives drops and dust.
If workers move across a large floor, choose a cordless Bluetooth model. For fixed scan stations, a corded USB model costs less and is always ready.
Can I use an imager barcode scanner with the accounting software?
Yes. A USB imager scanner in HID mode types data directly into any the accounting software field, just like a keyboard. It removes manual entry errors at the point of scan.
The limit is the accounting software itself: it does not track inventory locations, lot numbers, or bin assignments in real time. For full warehouse control, an inventory layer between the scanner and the accounting software handles the logic the accounting software cannot.
Do I need a rugged scanner or will a standard one work in my warehouse?
Almost every warehouse needs a rugged scanner. Standard scanners target light use and rarely survive a drop onto concrete. A rugged scanner rated IP65 or higher and MIL-STD-810 is built for drops, dust, and moisture.
The higher upfront cost pays for itself quickly when you compare it to replacing a standard scanner two or three times in the same period.
How many barcode scanners does a small warehouse operation need?
Start with one scanner per active scan station plus one spare for every 5 devices. A warehouse with a receiving desk, a packing bench, and a shipping station needs 3 scanners and 1 spare.
High-volume operations assign one scanner per shift worker. Begin with receiving and shipping stations for the biggest immediate gain, then add picking stations as budget allows.
What is the difference between an imager and a laser barcode scanner?
A laser scanner sweeps a beam across the code and reads 1D barcodes only, in line with the beam.
An imager takes a picture and decodes it, so it reads 1D and 2D codes from any angle, on damaged labels and on screens. Imagers have no moving mirror, which is why they survive drops better.
Can an imager barcode scanner read QR codes?
Yes. Any 2D imager reads QR codes, Data Matrix, and PDF417 as well as every 1D format. A linear imager, the cheaper 1D-only kind, does not.
Which imager barcode scanner is best for inventory?
A cordless 2D area imager with a scan range of 2 to 24 inches for a small warehouse, or a rugged mobile computer where staff scan all shift. Spend on the software that records the scan before spending on a premium scanner.
What should I look for when buying an imager barcode scanner?
Five things: 2D capability, scan range matched to your shelving, a drop rating of at least 5 feet for floor use, the connection you need (USB or Bluetooth), and confirmation that it reads phone screens if customers or drivers present codes on them.
Not sure this is the right shape for your operation?
The call is free. Describe how the work runs today. We map it on a call and show you what it would look like built around that, before you spend anything.
Book a callRelated guides
The rest of this guide, for the parts of the job this page does not cover.
Guides
- 2d Imager Barcode Scanner
- Barcode Scanner App Ios
- Barcode Scanner Inventory System
- Inventory Management Software Barcode Scanner
- 2d Wireless Barcode Scanner
- 2d Imaging Barcode Scanners
- 2d Usb Barcode Scanner
- Free Inventory Management Software with Barcode Scanner
- Barcode Scanner Description
- 2d Image Barcode Scanner
- Upc Scanner Gun
- Quickbooks Inventory Scanner
- Scanner Manuals
- Aml Scanners
- Warehouse Scanner System
- Scanner Inventory Software
- Barcode Abbreviation
- Barcode Scan Machine